Introduction: Why DIY-Friendly Stone Veneer Projects Are So Popular
Ever dreamed of giving your home that high‑end stone look without hiring a crew of masons? DIY-friendly stone veneer projects are your golden ticket. These thin, natural stone panels offer all the texture and charm of solid stone—minus the weight, cost, and complex installation. Whether you’re sprucing up your living room or transforming your backyard, tackling a stone veneer project yourself can be rewarding, budget‑friendly, and, dare we say, fun.
What Makes Stone Veneer Ideal for DIY Projects?
Lightweight and Easy to Handle
Stone veneer panels typically measure just ½–¾-inch thick, making them light enough for a couple of homeowners to carry up ladders or around the yard. No crane required!
No Heavy Machinery Required
Forget forklifts and jackhammers. All you need for DIY-friendly stone veneer projects is a notched trowel, level, and a steady hand. Perfect for weekend warriors.
Benefits of Tackling DIY-Friendly Stone Veneer Projects Yourself
Cost Savings
Hiring pros can be pricey. By doing it yourself, you save on labor while still getting that authentic look. And with materials from Southern Stoneworks, you get commercial‑grade veneer at homeowner prices.
Creative Control
You call the shots—choose your pattern, mix textures, play with grout color. It’s your vision, your pace, your masterpiece.
Skill Building
Learn handy new skills you can flaunt at the next block party. Plus, future home projects just got easier.

Project 1: Fireplace Surround – A DIY-Friendly Stone Veneer Project
Materials & Tools
- Sandstone veneers from Southern Stoneworks
- Thinset mortar or adhesive
- Notched trowel, level, wet saw for cuts
Natural Stone Slabs from Southern Stoneworks
Pair your veneers with a natural stone slab hearth for a cohesive look: natural stone slabs.
Step‑by‑Step Installation
- Prep & Layout: Mark your pattern on the wall.
- Adhesive Application: Spread thinset with a notched trowel.
- Veneer Placement: Press each piece firmly, checking level.
- Sealing: Once dry, apply a stone sealer to repel soot and dust.
Project 2: Outdoor Planter Boxes – A DIY-Friendly Stone Veneer Project
Choosing the Right Veneer
Opt for durable, frost‑resistant veneers to withstand outdoor conditions.
Applying to Wood Frames
- Build sturdy wood boxes with exterior‑grade plywood.
- Attach a cement backer board for a solid veneer substrate.
- Adhere veneers with exterior adhesive.
- Grout lightly between joints and seal.
Project 3: Accent Wall in Living Room – A DIY-Friendly Stone Veneer Project
Prep & Layout Tips
Measure your wall and dry‑lay veneers on the floor to find your favorite pattern before sticking them up.
Sealing for Longevity
Interior fireplaces and accent walls benefit from a penetrating sealer that guards against fingerprints and coffee rings.
Project 4: Outdoor Kitchen Backsplash – A DIY-Friendly Stone Veneer Project
Weatherproof Adhesives
Choose a polymer‑modified mortar rated for exterior use to handle heat and splatters.
Grouting Techniques
Use a sanded grout that resists cracking. Wipe excess grout quickly to avoid haze on stone faces.
Project 5: Garden Path Edging – A DIY-Friendly Stone Veneer Project
Trenching and Base Prep
Dig a shallow trench along your path edge, lay gravel for drainage, then install veneers upright to define borders.
Laying Veneer as Edging
Stand slim veneer pieces vertically, backfill with soil or mulch, and create a natural, low‑maintenance border.
Project 6: Hearth Extension – A DIY-Friendly Stone Veneer Project
Cutting for a Perfect Fit
Use a wet saw to slice your stone veneer to hearth depth. Chamfer edges for a seamless blend.
Bonding to Existing Hearth
Roughen the existing surface, apply thinset, press veneer strips in place, and seal grout lines.
Project 7: Bathroom Vanity Surround – A DIY-Friendly Stone Veneer Project
Waterproof Membrane
Install a liquid waterproof membrane on the vanity surround before veneering to prevent moisture damage.
Finishing with Grout
Use unsanded grout for tight seams, then seal to resist soap scum and humidity.
Project 8: TV Feature Wall – A DIY-Friendly Stone Veneer Project
Mounting Veneer Panels
Attach to cement backer board securely, ensuring no wires or brackets obstruct pieces. Veneer over holes with cutouts for cables.
Concealing Wires
Drill behind veneers and run wires through conduit for a clean, floating‑stone effect.
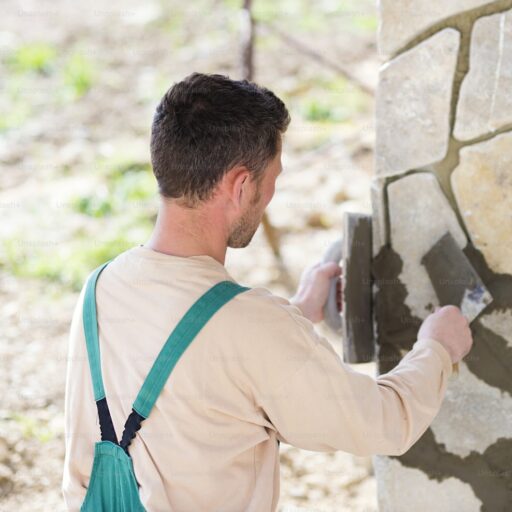
Project 9: Entryway Columns – A DIY-Friendly Stone Veneer Project
Base Preparation
For freestanding columns, use concrete posts or sturdy timber posts wrapped in backer board.
Stacking Veneer Layers
Start at the base, stagger joints for strength, and cap with a natural stone slab top: boulders & steps caps.
Project 10: Retaining Wall Facade – A DIY-Friendly Stone Veneer Project
Structural Considerations
Ensure your retaining wall has proper drainage and load‑bearing capacity before adding veneer.
Finishing Touches
Use full‑coverage veneer for a seamless appearance. Tie into surrounding garden pavers for a polished look.
Project 11: Fire Pit Surround – A DIY-Friendly Stone Veneer Project
Heat‑Resistant Adhesive
Select mortar rated for 1,200°F to keep veneers secure despite direct flame exposure.
Sealing & Maintenance
Apply a high‑temperature sealer and reseal annually. Clean ash away promptly to prevent staining.
Tips for Successful DIY-Friendly Stone Veneer Projects
Surface Preparation
Clean, level, and prime surfaces. A good substrate (cement board or stucco) makes all the difference.
Choosing the Right Adhesive
Use polymer‑modified thinset for interior installs and exterior‑rated mortar for outdoor projects.
Sealing and Care
Sealing isn’t optional—use a penetrating sealer suited to sandstone or flagstone to guard against moisture and stains. Follow flagstone care guidelines.
Conclusion
Tackling DIY-friendly stone veneer projects can transform your home, boost curb appeal, and save you money. From fireplaces and accent walls to garden edging and fire pits, the possibilities are endless—and the results are seriously impressive. Ready to roll up your sleeves? Grab your veneer samples from Southern Stoneworks LLC and start planning your next project today!
FAQs
- Do I need professional help for DIY stone veneer installation?
Not always—most small to medium veneer projects can be handled by homeowners with basic tools and the right prep. - How long does stone veneer installation take?
Simple jobs like planter boxes or small accent walls can take a weekend; larger projects may span several days. - Can stone veneers be used on any surface?
You need a stable substrate (cement board, treated wood, or properly cured stucco) for best adhesion. - Is sealing stone veneer really necessary?
Yes—sealer protects against moisture, stains, and wear, extending your project’s life. - How do I cut stone veneer safely?
Use a wet saw with a diamond blade and wear protective gear. Measure twice, cut once. - What maintenance do stone veneer projects require?
Occasional rinsing, spot cleaning, and resealing every 1–3 years depending on exposure. - Where can I find matching veneer and paver products?
Check out Southern Stoneworks LLC for coordinated natural stone slabs, pavers & flagstone, and more.